Creating bindinghandlers in Knockout.js with TypeScript.

In Javascript, creating knockout.js binding handlers can be done the following way:

ko.bindingHandlers.yourBindingName = {
    init: function(element, valueAccessor, allBindings, viewModel, bindingContext) {
        // This will be called when the binding is first applied to an element
        // Set up any initial state, event handlers, etc. here
    },
    update: function(element, valueAccessor, allBindings, viewModel, bindingContext) {
        // This will be called once when the binding is first applied to an element,
        // and again whenever any observables/computeds that are accessed change
        // Update the DOM element based on the supplied values here.
    }
};

However, if you use the same syntax in TypeScript if you have the knockout.js type definitions referenced, you will notice some nice red squigly lines under the “yourBindingName” part. This is because it is not in the bindingHandlers interface. To fix this you can add the new binding to the interface.

To do this, create a file with the .d.ts extension (for instance, myBindingHandlers.d.ts) and add the following code to it:

/// <reference path="typings/knockout/knockout.d.ts" />

interface KnockoutBindingHandlers {
    yourBindingName: KnockoutBindingHandler;
}

This wil add your binding handler to the interface, and everything works and its typesafe too.

Signing executables with authenticode certificate without the need for CAPICOM.

A couple of years ago the recommended way of signing executables with an authenticode certificate was using the SignTool applications that is distributed with the Windows SDK. With the release of x64 operating systems (especially Windows 7 x64) people started seeing that tool fail since it depends on CAPICOM, and this is only available in 32-bits (and it is also not supported anymore).

I already discussed this issue in a previous blogpost. But i wanted a permanent solution because it gets annoying redirecting my co-workers to a tool that is unsupported and doesn’t work out of the box. I decided to do some research on the subject and came up with a tool that does what we need it to do, but is not a full replacement for Microsoft’s own SignTool.

I could not have done this without this exelent blog post.

I started with refactoring the p/invoke code to C#:

// #define CRYPTUI_WIZ_NO_UI     1
public const int CRYPTUI_WIZ_NO_UI = 1;

// #define CRYPTUI_WIZ_DIGITAL_SIGN_SUBJECT_FILE     0x01
public const int CRYPTUI_WIZ_DIGITAL_SIGN_SUBJECT_FILE = 1;

// #define CRYPTUI_WIZ_DIGITAL_SIGN_CERT                    0x01
public const int CRYPTUI_WIZ_DIGITAL_SIGN_CERT = 1;

// #define CRYPTUI_WIZ_DIGITAL_SIGN_COMMERCIAL  0x0001
public const int CRYPTUI_WIZ_DIGITAL_SIGN_COMMERCIAL = 1;

// typedef struct _CRYPTUI_WIZ_DIGITAL_SIGN_INFO {  
//   DWORD dwSize;  
//   DWORD dwSubjectChoice;  
//   union {    
//       LPCWSTR pwszFileName;    
//       PCCRYPTUI_WIZ_DIGITAL_SIGN_BLOB_INFO pSignBlobInfo;  
//   };  
//   DWORD dwSigningCertChoice;  
//   union {    
//       PCCERT_CONTEXT pSigningCertContext;    
//       PCCRYPTUI_WIZ_DIGITAL_SIGN_STORE_INFO pSigningCertStore;    
//       PCCRYPTUI_WIZ_DIGITAL_SIGN_CERT_PVK_INFO pSigningCertPvkInfo;  
//   };  
//   LPCWSTR pwszTimestampURL;  
//   DWORD dwAdditionalCertChoice;  
//   PCCRYPTUI_WIZ_DIGITAL_SIGN_EXTENDED_INFO pSignExtInfo;
// } CRYPTUI_WIZ_DIGITAL_SIGN_INFO;
[StructLayout(LayoutKind.Sequential)]
public struct CRYPTUI_WIZ_DIGITAL_SIGN_INFO
{
    public int dwSize;
    public int dwSubjectChoice;
    [MarshalAs(UnmanagedType.LPWStr)]
    public string pwszFileName;
    public int dwSigningCertChoice;
    public IntPtr pSigningCertContext;
    [MarshalAs(UnmanagedType.LPWStr)]
    public string pwszTimestampURL;
    public int dwAdditionalCertChoice;
    public IntPtr pSignExtInfo;
}

//typedef struct _CRYPTUI_WIZ_DIGITAL_SIGN_EXTENDED_INFO {
//  DWORD             dwSize;
//  DWORD             dwAttrFlags;
//  LPCWSTR           pwszDescription;
//  LPCWSTR           pwszMoreInfoLocation;
//  LPCSTR            pszHashAlg;
//  LPCWSTR           pwszSigningCertDisplayString;
//  HCERTSTORE        hAdditionalCertStore;
//  PCRYPT_ATTRIBUTES psAuthenticated;
//  PCRYPT_ATTRIBUTES psUnauthenticated;
//} CRYPTUI_WIZ_DIGITAL_SIGN_EXTENDED_INFO, *PCRYPTUI_WIZ_DIGITAL_SIGN_EXTENDED_INFO;
[StructLayout(LayoutKind.Sequential)]
public struct CRYPTUI_WIZ_DIGITAL_SIGN_EXTENDED_INFO
{
    public int dwSize;
    public int dwAttrFlags;
    [MarshalAs(UnmanagedType.LPWStr)]
    public string pwszDescription;
    [MarshalAs(UnmanagedType.LPWStr)]
    public string pwszMoreInfoLocation;
    [MarshalAs(UnmanagedType.LPStr)]
    public string pszHashAlg;
    [MarshalAs(UnmanagedType.LPWStr)]
    public string pwszSigningCertDisplayString;
    public IntPtr hAdditionalCertStore;
    public IntPtr psAuthenticated;
    public IntPtr psUnauthenticated;
}

// typedef struct _CRYPTUI_WIZ_DIGITAL_SIGN_CONTEXT {  
//      DWORD dwSize;  
//      DWORD cbBlob;  
//      BYTE* pbBlob;
// } CRYPTUI_WIZ_DIGITAL_SIGN_CONTEXT;
[StructLayout(LayoutKind.Sequential)]
public struct CRYPTUI_WIZ_DIGITAL_SIGN_CONTEXT
{
    public int dwSize;
    public int cbBlob;
    public IntPtr pbBlob;
}

// BOOL WINAPI CryptUIWizDigitalSign(
//      DWORD dwFlags,
//      HWND hwndParent,
//      LPCWSTR pwszWizardTitle,
//      PCCRYPTUI_WIZ_DIGITAL_SIGN_INFO pDigitalSignInfo,
//      PCCRYPTUI_WIZ_DIGITAL_SIGN_CONTEXT* ppSignContext
// );
[DllImport("Cryptui.dll", CharSet = CharSet.Unicode, SetLastError = true)]
public static extern bool CryptUIWizDigitalSign(
    int dwFlags,
    IntPtr hwndParent,
    [MarshalAs(UnmanagedType.LPWStr)]
    string pwszWizardTitle,
    ref CRYPTUI_WIZ_DIGITAL_SIGN_INFO pDigitalSignInfo,
    ref IntPtr ppSignContext);

// BOOL WINAPI CryptUIWizFreeDigitalSignContext(
//   PCCRYPTUI_WIZ_DIGITAL_SIGN_CONTEXT pSignContext
// );
[DllImport("Cryptui.dll", CharSet = CharSet.Auto, SetLastError = true)]
public static extern bool CryptUIWizFreeDigitalSignContext(IntPtr pSignContext);

I added the CRYPTUI_WIZ_DIGITAL_SIGN_EXTENDED_INFO structure as well. I didn’t get this part to work, but I kept the definition for future reference.

With the P/Invoke definitions done actually signing a file was remarkably simple (don’t mind the CommandLineArguments class, it is defined in the sample download):

var cert = new X509Certificate2(cla.Certificate, cla.Password);
var digitalSignInfo = new CRYPTUI_WIZ_DIGITAL_SIGN_INFO();
digitalSignInfo.dwSize = Marshal.SizeOf(digitalSignInfo);
digitalSignInfo.dwSubjectChoice = CRYPTUI_WIZ_DIGITAL_SIGN_SUBJECT_FILE;
digitalSignInfo.pwszFileName = cla.FileToSign;
digitalSignInfo.dwSigningCertChoice = CRYPTUI_WIZ_DIGITAL_SIGN_CERT;
digitalSignInfo.pSigningCertContext = cert.Handle;
digitalSignInfo.pwszTimestampURL = cla.TimestampUrl;
digitalSignInfo.dwAdditionalCertChoice = 0;
digitalSignInfo.pSignExtInfo =IntPtr.Zero;

IntPtr pSignContext = IntPtr.Zero;
if (!CryptUIWizDigitalSign(CRYPTUI_WIZ_NO_UI, IntPtr.Zero, string.Empty, ref digitalSignInfo, ref pSignContext))
{
    throw new Win32Exception(Marshal.GetLastWin32Error(), "CryptUIWizDigitalSign");
}

if (!CryptUIWizFreeDigitalSignContext(pSignContext))
    throw new Win32Exception(Marshal.GetLastWin32Error(), "CryptUIWizFreeDigitalSignContext");

This is all there is to it. I have included a zipped sample of the application which includes a bit more plumbing (like some crude command line arguments handling). And a failed attempt to also use the extended info class (that would be needed for the original SignTool’s /d and /du options).

Download the sample here: SignToolNet

Visual Studio 2013 Update 2 dialog to trust IIS express SSL certificate keeps returning

The title says it all. Since I installed Visual Studio 2013 Update 2, running my SSL enabled web projects presented me with the following message:

But even when checking the ‘Don’t ask me again’ button I was presented with the exact same message the next time I tried to debug.

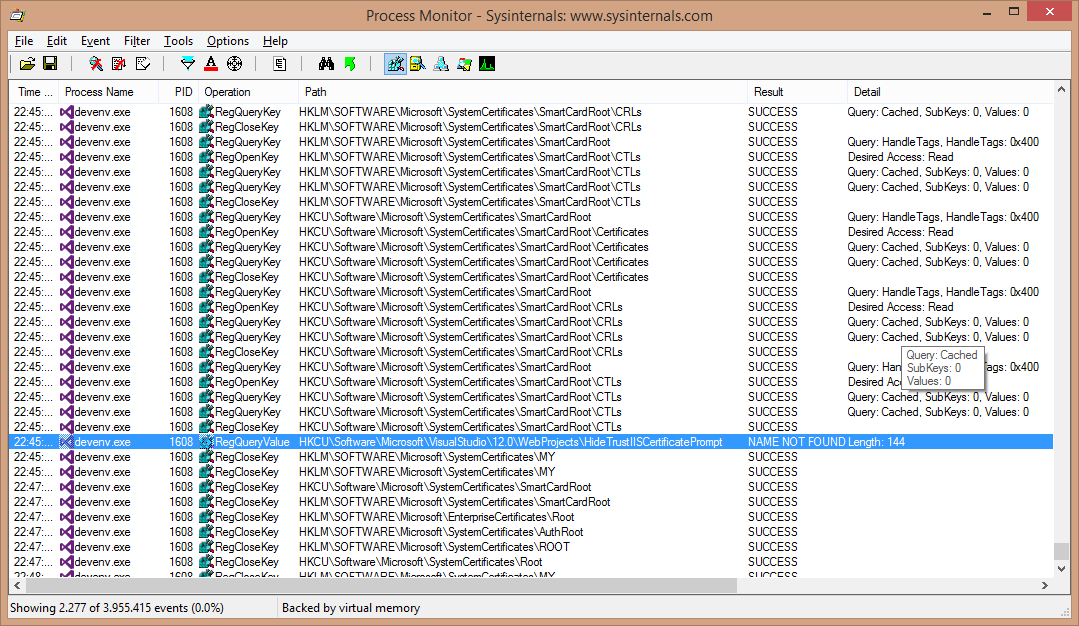
I decided to start up my go-to tool in these situations; SysInternals ProcMon (http://technet.microsoft.com/en-us/sysinternals/bb896645). To find out what was going wrong. I suspected Visual Studio had problems writing to the correct registry key or something like that. It turned out I was right:

Is was just a question of adding this (HKCUSoftwareMicrosoftVisualStudio12.0WebProjectsHideTrustIISCertificatePrompt) value to the registry (DWORD) and setting it to 1 to make the message box disappear forever.

Disclaimer: If you don’t know how to handle registry changes you should probably read up on that kind of stuff (or let your sysadmin fix it for you).

TFS Lab Environment stuck in “Deploying” state

A few days ago we had a sudden SQL Server reboot of the server hosting the TFS databases. Though I still have to determine the cause of that, it had a nasty side effect. When the crash occurred a deployment of a build to a lab environment was in progress. This caused the lab environment to stay in the deploying state even though the build was stopped and even deleted.

To fix things I had to dive into the actual table holding the Lab environment information of your project collection (called LabEnvironments in your project collection database).

The problem was that there was still a BuildUri value in the record for my Environment. After deleting that (and seeing one more build fail). Things were back to normal again.

Preparing for 70-496: Administering Visual Studio Team Foundation Server 2012

I am finally trying to make some time to study for and pass this exam. I thought I’d write down my progress and study plan in case other people find it interesting. First of all you should head to the Microsoft site for this exam:

http://www.microsoft.com/learning/en-us/exam-70-496.aspx

Since I am a self-paced training kinda guy I’ll start with the Jump Start course (which is free). I already know quiet a lot about TFS so this probably won’t be much of a challenge. I also don’t think it will be enough to pass the exam.

http://www.microsoftvirtualacademy.com/training-courses/administering-visual-studio-tfs-2012-exam-496-jump-start

After this I am going to go through the measures skills categories one at a time. I could download Brian Keller’s excellent TFS VM’s (http://blogs.msdn.com/b/briankel/archive/2013/08/02/visual-studio-2013-application-lifecycle-management-virtual-machine-and-hands-on-labs-demo-scripts.aspx), but since the first category of measures skills is “Installation and Configuration” I think I’ll create a VM myself.

More on that later.

ClosedXml exception when opening an Excel sheet.

We handle may Excel sheets in our automated systems and we use the great ClosedXml opensource library (https://closedxml.codeplex.com/). However today we stumbled upon a sheet that crashed one of our applications.

InvalidOperationException: Sequence contains no matching elements.

After downloading the ClosedXml source I found out the sheet had a rogue comment. Somehow this comment did not have the shapetype that ClosedXml expected. After removing it everything ran smoothly again.

It seems I am, for the first time, going to make a bugfix contribution to an opensource project….

Is your KnockoutJS ‘options’ binding working on IE11 but not on IE8?

I had this issue, and since I am not a javascript expert, it took me a while to figure this out.

If you are binding to a static array (declared in code) like such:

self.statusOptions = [
        { name: "Option 1", id: 1 },
        { name: "Option 2", id: 2 },
        { name: "Option 3", id: 3 },
    ];

This will go horribly wrong because the that final comma. In IE 8 this means there is another, empty, item in the array. In IE11 this seems to work fine. So change it to this and you are good to go:

self.statusOptions = [
        { name: "Option 1", id: 1 },
        { name: "Option 2", id: 2 },
        { name: "Option 3", id: 3 }
    ];

How to apply Web.config transformations during TFS build.

Just a simple reminder to myself, because I already had to look this up twice:

If you want a project’s web.config files to use transformations as it would when you hit deploy in VS, you need to set the following MSBuild arguments in your Team Build definition:

/p:UseWPP_CopyWebApplication=True /p:PipelineDependsOnBuild=False

And it looks like this:

Legacy and .NET interop on x86 vs x64

The problem

When writing .NET applications that need to interoperate with (legacy) 32-bit ODBC drivers, COM libraries and such. You might run into problems on 64-bit OS installations. By default applications written using the .NET Framework 4 or earlier will be compiled with the “Platform Target” option as “Any CPU”. When such an application accesses a 32-bit COM component on a 64-bit machine you might see the following kind of exception:

This operation failed because the QueryInterface call on the COM component for the interface with IID ‘{YOUR-GUID-HERE}’ failed due to the following error: Old format or invalid type library. (Exception from HRESULT: 0x80028019 (TYPE_E_UNSUPFORMAT)).

When trying to access and ODBC connection you might find that there are 64-bits and 32-bits ODBC connections. And that older drivers can only be used for 32-bits ODBC connections.

Solution 1

If you catch this during in-house testing you will be able to fix the problems by forcing the compiler to use the x86 platform. By going to the project properties, than go to the “Build” tab and setting the “Platform Target” to “x86” like so:

However, be aware that this is a configuration specific setting, so if you are wondering why your release builds are still giving you these problems you should also apply this setting for the Release configuration.

If all of the components in your solution should be built using the x86 platform target or if you want to be able to create separate x64 and x86 builds it is probably better to create solution platforms for both. You can do this by right clicking on the solution and choosing “Configuration Manager”:

Here you can create custom solution platforms and allow you to select the project’s platform for each of your projects.

Solution 2

If you are using the .NET Framework 4.5 from the start of your project you might have noticed you do not run into the above problems. This is because of a new setting that is on by default called “Prefer 32-bit” (this settings was conveniently greyed out for met .NET Framework 4 project screenshot above).

If it is possible to upgrade to the .NET Framework 4.5 then this is a much cleaner way of dealing with things. Though just upgrading is not enough, after the upgrade you DO need to actually check the box to enable it.

More info on this option can be found here: http://blogs.microsoft.co.il/sasha/2012/04/04/what-anycpu-really-means-as-of-net-45-and-visual-studio-11/

Solution 3

So what if you shipped your product built in .NET 4.0 and the Platform set to “Any CPU”. The customer might not want to upgrade to your new and improved version, and you don’t want to rebuild the version he is using. Or you just found out and a release with the fix might be months away (and of course the customer can’t wait that long).

When that happens it is time to fall back to solution number 3: CorFlags.exe which is a tool installed with Visual Studio and is available from the “Developer Command Prompt”.

This tool allows you to edit the header section of your .NET executable. And can be used in the following way:

CorFlags.exe MyApp.exe /32BIT+
or
CorFlags.exe MyApp.exe /32BIT+ /Force

The latter is used if you have a strong signed assembly. This will break the signing so be careful with that. More info on the tool can be found here: http://msdn.microsoft.com/en-us/library/ms164699(v=vs.110).aspx


The case of the hanging Visual Studio 2013

Today was a frustrating day where my Visual Studio went into a hang (endless loop of some kind) whenever I tried to debug a web application. I have yet to determine what caused it but I fixed it by running the following command from a developer command prompt:

devenv.exe /ResetSettings

After this I could debug my web projects again. More info on the command and other command line switches for the devenv executable can be found on this MSDN page.